

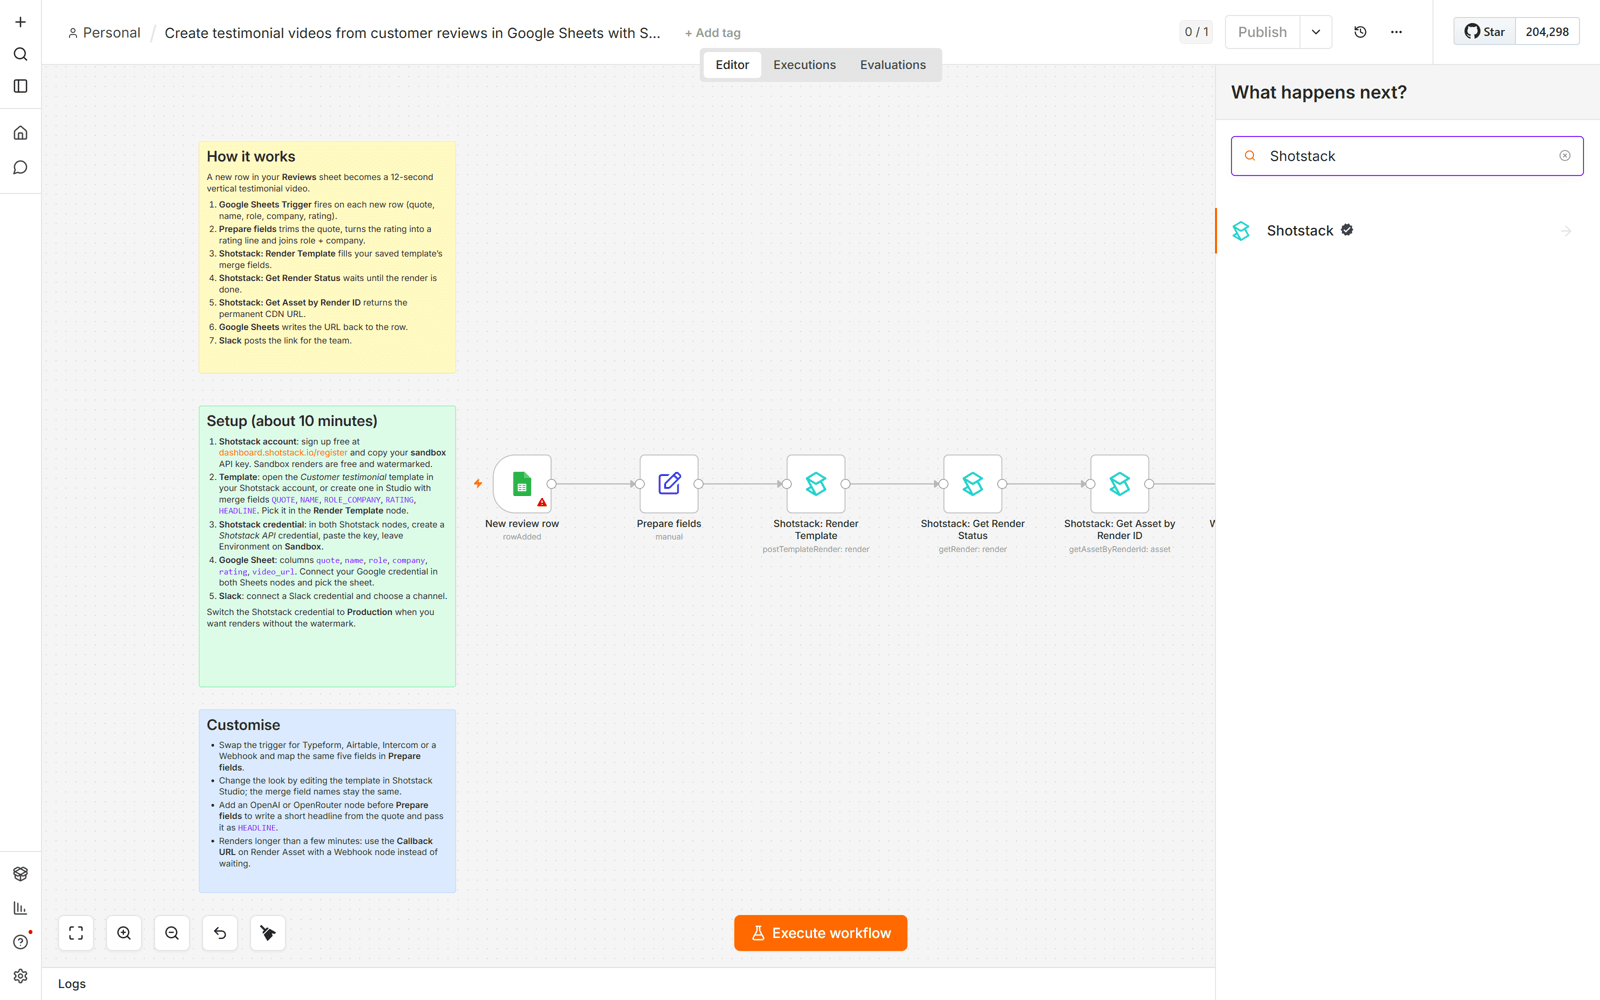
Creating engaging video content is time‑consuming, but with the new official Shotstack node for n8n you can automate the entire pipeline. A customer submits a short review through an n8n form, the workflow renders a 12‑second vertical testimonial, stores the video URL in a Google Sheet, and shows the finished clip to the user. The guide below walks through installing the node, configuring credentials, preparing a merge‑field template, and assembling the workflow in under ten minutes.
Context and practical value
The source explains how to use the official Shotstack node in n8n to render testimonial videos from a form, wait for the render, retrieve a permanent URL, and store the result in Google Sheets. It details credential setup, template upload, workflow construction, and performance considerations.
This article distills the source into a concise, step‑by‑step guide, highlights reusable patterns, and expands on credential management, cost tracking, and adaptation to other form or CMS platforms. It also adds a community discussion prompt and practical next steps for developers and automation operators.
Key takeaways
- 1. The Shotstack node replaces manual HTTP requests and polling loops, providing a single step that renders a template and returns a permanent URL.
- 2. A merge‑field template lets you inject dynamic data (quote, name, rating, etc.) into a reusable video design.
- 3. The workflow can be adapted to any form source or output destination—Google Sheets, Airtable, or a CMS—by swapping a few nodes.
- 4. Using a sandbox key keeps renders free and watermarked, while a production key consumes credits and produces watermark‑free videos.
Why Use Shotstack in n8n
Shotstack offers a REST API for video editing, but the community node abstracts the HTTP calls, error handling, and polling into a single, n8n‑native operation. This means you no longer need a Wait node or a loop that checks the render status. The node’s "Get Render Status" operation can be toggled to wait until the render finishes, simplifying the workflow and reducing the chance of timeouts.
Preparing the Merge‑Field Template
The template JSON contains six merge fields: HEADLINE, QUOTE, NAME, ROLE_COMPANY, RATING_NUM, and ACCENT. Each field is replaced with data from the workflow before rendering. The template is uploaded to Shotstack via a POST to /edit/v1/templates, after which it appears in the node’s template picker. Because the field names are part of the contract, you can change fonts, colors, or timing in Shotstack Studio without breaking the workflow.
Building the n8n Workflow
- Form Trigger – Collects review text, name, role, company, and rating. 2. Set Node – Cleans and formats the data, ensuring the rating is an integer 1‑5. 3. Shotstack: Render Template – Fills the template’s merge fields. 4. Shotstack: Get Render Status – Waits for completion (up to 5 minutes). 5. Shotstack: Get Asset by Render ID – Returns the permanent CDN URL. 6. Google Sheets – Appends a row with the video URL and review metadata. 7. HTTP Response – Shows a thank‑you page with the video link. The entire workflow can be imported as JSON or built manually; the node handles all API interactions.
Adapting the Pattern
Replace the form trigger with any other trigger (Typeform, Trustpilot, Shopify reviews) and map the same five fields. Swap the Google Sheets node for Airtable, Notion, or a custom CMS. Add an OpenAI node before the Set node to generate a headline automatically. The core Shotstack nodes remain unchanged, making the pattern highly reusable.
Credential Management
Create a Shotstack credential with your production API key and set the environment to Production for watermark‑free renders. For testing, add a second credential with a sandbox key and set the environment to Sandbox. The credential lives on the node, not the workflow, so you can switch environments without editing the workflow.
Performance and Costs
Render times vary from 45 seconds to three minutes, depending on the template and server load. Each render consumes credits; sandbox renders are free but watermarked. Keep track of credit usage in your Shotstack dashboard and set a give‑up timeout in the Get Render Status node to avoid hanging workflows.
Practical next steps
- 1. Install the Shotstack node from the community panel and create a Shotstack credential with your production key. 2. Upload the provided customer‑testimonial template to Shotstack via the API or Studio. 3. Build the workflow using the nodes listed above, mapping the merge fields exactly. 4. Test the workflow with a sandbox key to confirm the video renders and the URL appears in Google Sheets. 5. Switch to the production credential, publish the workflow, and share the form URL with customers.
- Open the original source and verify its prerequisites, workflow, and current product behavior before adopting it.
- Test the approach on a small non-production example and record the inputs, output quality, runtime, and failure modes.
Limits and verification
- The workflow relies on Shotstack’s API availability; any downtime or rate limits will pause the workflow. Credit consumption is not tracked automatically, so you must monitor your Shotstack dashboard to avoid running out of credits.
FAQ
Can I use this workflow with a different form provider?
Yes. Replace the n8n Form Trigger node with a trigger for the provider you use (e.g., Typeform, Google Forms) and map the same five fields in the Set node.
What happens if the render fails?
The Get Render Status node will return an error message from Shotstack. You can add a fallback node to log the failure or notify your team via Slack.
How do I change the video style?
Edit the template in Shotstack Studio, keeping the merge field names unchanged, or adjust the ACCENT field in the workflow to change colors.